Posted on: Apr 3, 2018  We know you put a lot of time and effort into your flow cytometry experiments. Follow these 7 tips to ensure that your high-quality flow data is more likely to be published!
- Select the right cytometer
- Prepare your samples correctly
- Design a functioning multicolor panel
- Use appropriate controls
- Optimize your staining protocol
- Develop an appropriate gating strategy
- Calculate the correct compensation
1. Select the right cytometer A successful experiment starts by selecting the correct equipment. If you’re lucky enough to work with a core that offers a variety of cytometer options, then you may find yourself asking which one is the “best” for you. Whether you are running a basic 4 color experiment or trying 18+ colors for the first time, it is important to understand the capabilities of your flow cytometer. Most modern cytometers are configured with two or more lasers that pass through specific filters before being read by various detectors. This configuration defines the instrument’s experimental capabilities of how many colors can be detected simultaneously. Learn more about each cytometer model, here. 2. Prepare your sample correctly Living cell samples must be properly cleaned, suspended, filtered and kept alive prior to running on a cell sorter or flow cytometer. Additionally, dead cells must be removed to reduce false positives or non-specific signals. Expert cytometrists strongly recommend using live/dead exclusion markers, as it is often difficult to exclude all dead cells via gating alone. Learn more about live cell sample prep, here. Fixing cells eliminates the need to keep samples alive by “freezing” them in a specific state. This also may allow membrane permeabilization for intracellular marker staining. However, fixation may introduce additional sample preparation or staining complications, so it is recommended that you consult your core manager regarding the best fixation methods. 3. Design a functional multicolor panel Fortunately, researchers no longer need to design their multi-color flow cytometry panels by hand. Online resources like FluoroFinder’s panel design tool make the process much simpler and faster. Be sure to select antibody/fluorochrome combinations that will work well together and are appropriate for your cell types. Reduce signal spillover by comparing how your fluorophores will interact on a SpectraViewer. FluoroFinder allows researchers to compare >500,000 antibodies and >600 fluorophores from 50 top suppliers. 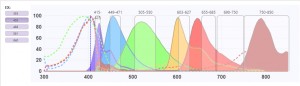 Example of multicolor comparison on FluoroFinder’s SpectraViewer Also, consider the antigen density of each marker when selecting fluorophores. Use brighter fluorophores for weakly expressed markers and dimmer fluorophores for abundantly expressed markers. 4. Use appropriate controls Be sure you include all the necessary controls for your experiment type, including:
- Viability Dyes – Unsure about how to choose the best viability dye control? See more, here.
- Fluorescence Minus One controls
- Compensation controls – See tip #7 for more about compensation
- Isotype controls
- Positive/Negative Sample controls
- Dump Channel
Learn more about these various flow cytometry controls, here. 5. Optimize staining protocols Titrate each antibody to find optimal concentrations for maximizing the signal-to-noise ratio. Reduce nonspecific binding by including BSA or unconjugated antibody in your staining buffer. Also, consider where each marker is expressed and how that may affect your staining order. For example, membrane surface markers may need to be stained prior to fixation/permeabilization, but then some fluorophores may also be sensitive to certain fixation techniques. 6. Develop an appropriate gating strategy Flow cytometry gating can often seem like a daunting task. While there is no single solution, experienced cytometrists can recommend several tips for properly gating your cells. Learn more about gating methodologies, here. 7. Calculate your compensation Researchers use a process called fluorescence compensation to correct for any spectral overlap. Compensation ensures that the signal detected in a particular detector derives from the fluorochrome that is being measured. Compensation controls (see tip #4) containing both positive and negative populations are required for each fluorochrome.
- If possible, the positive and negative populations should be of the same cell type.
- If using different cell types, the pre-stain autofluorescence levels of both the positive and negative populations should equal.
- The positive signal should be as bright as (or brighter than) anything being measured in the experiment.
- The positive signal should form at least 10% of the population.
Compensation is set when the median signals of the unstained and the fully stained populations are measured equally in the spillover channel. Looking for more info on compensation techniques? Check back next month for our upcoming newsletter: “Your Comprehensive Guide to Compensation” window.dojoRequire(, function(L) { L.start({“baseUrl”:”mc.us8.list-manage.com”,”uuid”:”cba3ad362dd32e433ed10c783″,”lid”:”461923b4c9″,”uniqueMethods”:true}) })