Written By Sarah Locknar
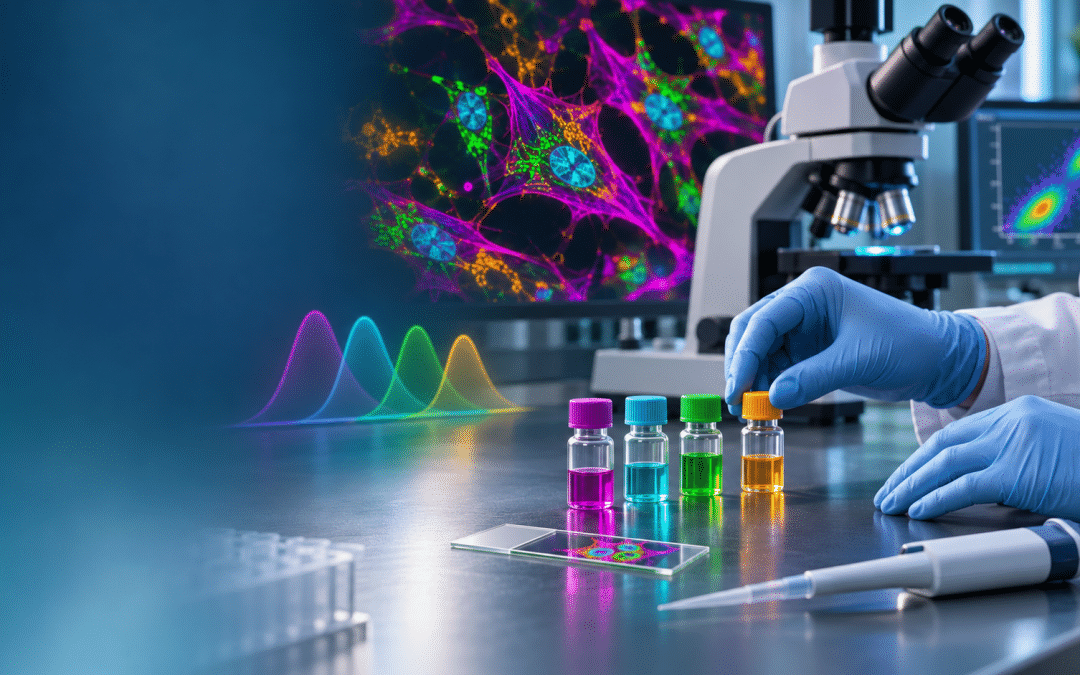
Cover: A researcher selects fluorescent antibody reagents beside a microscope, with multicolored cell imaging and spectral curves in the background, illustrating the planning and tools behind immunofluorescence experiments.
Immunofluorescence Experiment Design – Challenges and Tools
A supervisor’s favorite question is “how long until we get the results?” This article helps you plan out your experiment with respect to time and reagents before you even pick up a pipette, so you can answer that question with some confidence. Regardless of whether you’re planning a flow cytometry or fluorescence microscopy experiment, the initial steps of designing the immunofluorescence (IF) protocol remains the same. The use of pre-validated commercial panels from companies like Bio-Rad, Miltenyi Biotec, and R&D systems speed up the process of flow cytometry IF design, but many scientists are interested in detecting non-standard antigens.
Step 1. Choosing the antibodies
Before you start, determine how many antigens you would like to label and their approximate abundance in the sample you are preparing. Resources such as PAXdb and The Human Protein Atlas can help researchers determine concentrations of various antigens in their samples. FluoroFinder’s Antibody Search tool can be used to look for matches across 100+ suppliers. Results include a list of species reactive to that antibody and whether it is already dye conjugated (Figure 1). Many individual suppliers also have search tools for their own products.
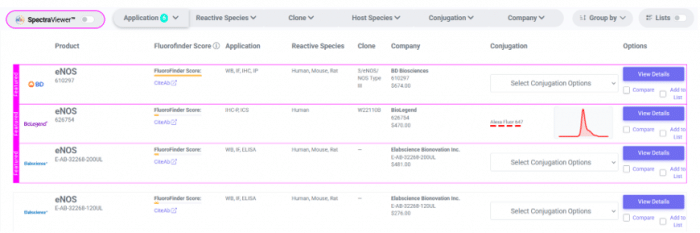
Figure 1. FluoroFinder’s Antibody Search tool provides a way to quickly search for antibodies across many companies. In this case, nitric oxide synthase (NOS) is the antigen of interest.
Some questions to consider are:
- Are you likely to need to amplify the signal?
a. NO – direct-conjugated fluorescent primary (1o) antibodies (Abs) can be used (direct IF).
Are conjugated 1o Abs available?
i. YES – order as needed.
ii. NO – follow a conjugation protocol followed by purification and characterization. FluoroFinder’s Antibody Search tool can also help identify conjugation kits and services, under the “Select Conjugation Options” dropdown menu (Figure 1).
b. YES – at a minimum, fluorescently-conjugated secondary (2o) antibodies should be used (indirect IF). Each 2o Ab is conjugated to several fluorophores, and several 2o Abs bind to each 1o Make sure fluorescently-conjugated 2o Abs to the animal that generated the 1o Ab are available. For instance, if the 1o Ab was isolated from rabbit, the 2o Ab should be anti-rabbit. The “Select Conjugation Options” dropdown menu (Figure 1) of FluoroFinder’s Antibody Search tool can be used to find appropriate 2o Abs.
If the indirect IF signal is still too weak, additional amplification methods can be used, such as labeled-streptavidin biotin (LSAB), and tyramide signal amplification (TSA), or fluorescent signal amplification via cyclic staining of target molecules (FRACTAL).
- If you plan to label a large number of different antigens, are direct-conjugated fluorescent 1o Abs available for all your antigens?
a. YES – proceed with dye selection
b. NO – a combination of direct IF and indirect IF can be used.
Are the 1o Abs all from different animals?
i. YES – Choose a different fluorescent dye for each label as described below.
ii. NO – Investigate cyclic IF strategies. FluoroFinder is currently developing a tool to help design these experiments. Please contact support@fluorofinder.com for more information.
Step 2. Choosing fluorescent dyes
Once 1o and 2o Abs have been identified, fluorescent labels should be considered, based on knowledge of your hardware. FluoroFinder’s SpectraViewer can be used alone or within the Antibody Search tool to view the spectra of several fluorescent labels simultaneously as you design your experiment. Customers can also simulate their instruments in the software, choosing from a pulldown list (flow cytometry) or setting up a custom configuration.
- Determine which fluorophores can be used in your system.
a. The excitation lasers (or other light sources with filters) should overlap with the excitation (or absorption) spectrum of each fluorophore (Figure 2).
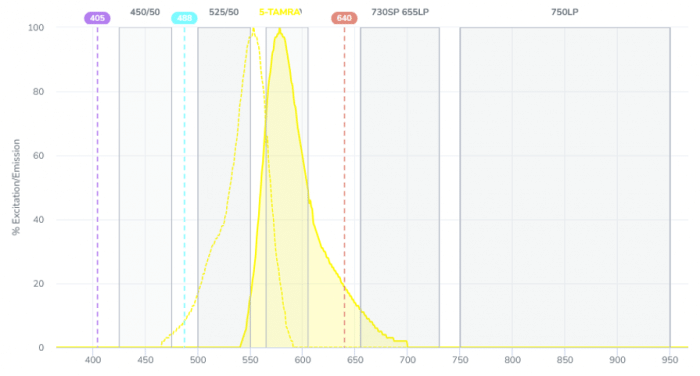
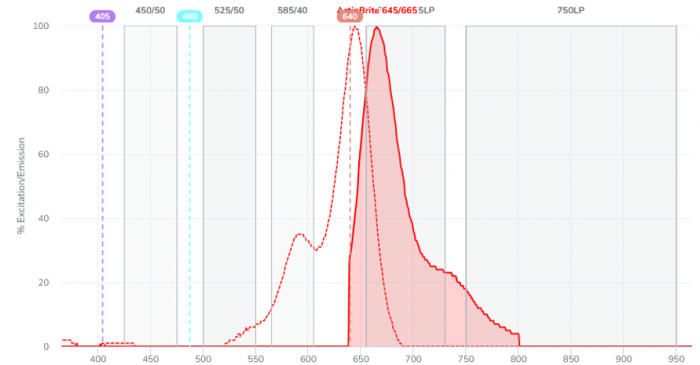
Figure 2. An example system with 3 lasers (405, 488 and 640 nm) and 5 emission filters modeled with FluoroFinder Spectra Viewer. The fluorophore in the top image would be a poor choice. The 488 nm laser only interacts with the tail of the excitation spectrum, so signal will be low even though there is good overlap with the emission filter. The fluorophore in the bottom image is a better choice for this experiment- the excitation peak is very close to the laser line at 640 nm and there is good overlap with the emission filter.
b. Emission filters (or the spectral detector) should do a good job of resolving each fluorophore’s emission peak. Depending on the system, filters may be changed by the user to optimize the signal to noise ratio.
2. Use the brightest, most stable fluorophores for labeling of the least abundant antigens.
3. Are antigens co-expressed in certain cell types (mostly for flow cytometry experiments)?
a. YES – this should be considered during dye selection so spectral separation can be achieved.
b. NO – similar dyes can be used across different cell types
c. FluoroFinder’s flow cytometry Panel Builder allows you to “turn on” co-expression in each expected cell type.
4. Design control experiments to evaluate and correct crosstalk between fluorescence channels in multiplex experiments. For flow cytometry, this is called spectral spillover and in microscopy it is called bleedthrough. Control experiments can use fluorescently-labelled beads, “synthetic cells” or singly-labelled samples.
Step 3. Sample preparation
Once Abs and dyes have been identified (and time allotted for conjugation, if necessary), the sample preparation method should be considered. Samples range from whole animals (e.g. C. elegans, mice) to tissues and tissue sections, to cells (blood, yeast, algae, etc.).
- Will live cells/ tissue be used?
a. YES – determine time required for dissection, dissociation and/or concentration
b. NO – follow a fixation protocol. Typically samples are fixed with formalin or paraformaldehyde to crosslink proteins. Sometimes dehydration fixatives are used, like methanol. Fixation of whole mounts can take a considerable amount of time (days) for the fixatives to diffuse in. Fixatives can also be introduced by perfusion in whole animals like mice.
Does the sample need additional processing like sectioning?
i. NO – proceed to staining
ii. YES – factor time for dehydration, embedding and sectioning to the desired thickness. In pathology labs, samples are often frozen first, then sectioned and fixed.
2. Fixed samples often require permeabilization and an antigen retrieval step before labeling. These include heat-induced epitope retrieval (HIER) and proteolytic-induced epitope retrieval (PIER) to unmask antigens that have been cross-linked and hidden during the fixation process.
Step 4. Immunolabelling
- Blocking of non-specific binding is recommended prior to most IF labelling.
2. Antibody concentrations and incubation times require some trial and error if you are using new reagents.
a. For living cells and tissues, only surface antigens can be labelled. This occurs relatively quickly, especially in isolated cells.
b. Fixed cells or thin (<10 micron) slices are also labelled quickly since diffusion is rapid in these cases.
c. For whole mounts and thick slices, immunolabelling can be even slower than the fixation step. Read this article to learn more about how to deal with diffusion in thick samples.
Planning complete!
You can now check that you have all your reagents and order what’s missing (which can sometimes take the longest!) FluoroFinder’s flow cytometry Panel Builder (and microscopy panel builder, under development) streamlines the process of finding antibodies and dye combinations that work with the instruments available to you. It can also keep track of inventory levels and preferred suppliers to make the design process and ordering even faster.
At this point, you should have good time estimates for your experiment prep work. Oddly, running the actual experiment is often the quickest step in the process. Don’t forget to add time for controls and data analysis too!